Simple Capacitive Touch Example

Simple Arduino example adapted from here to turn an LED on/off using capacitive touch sensing
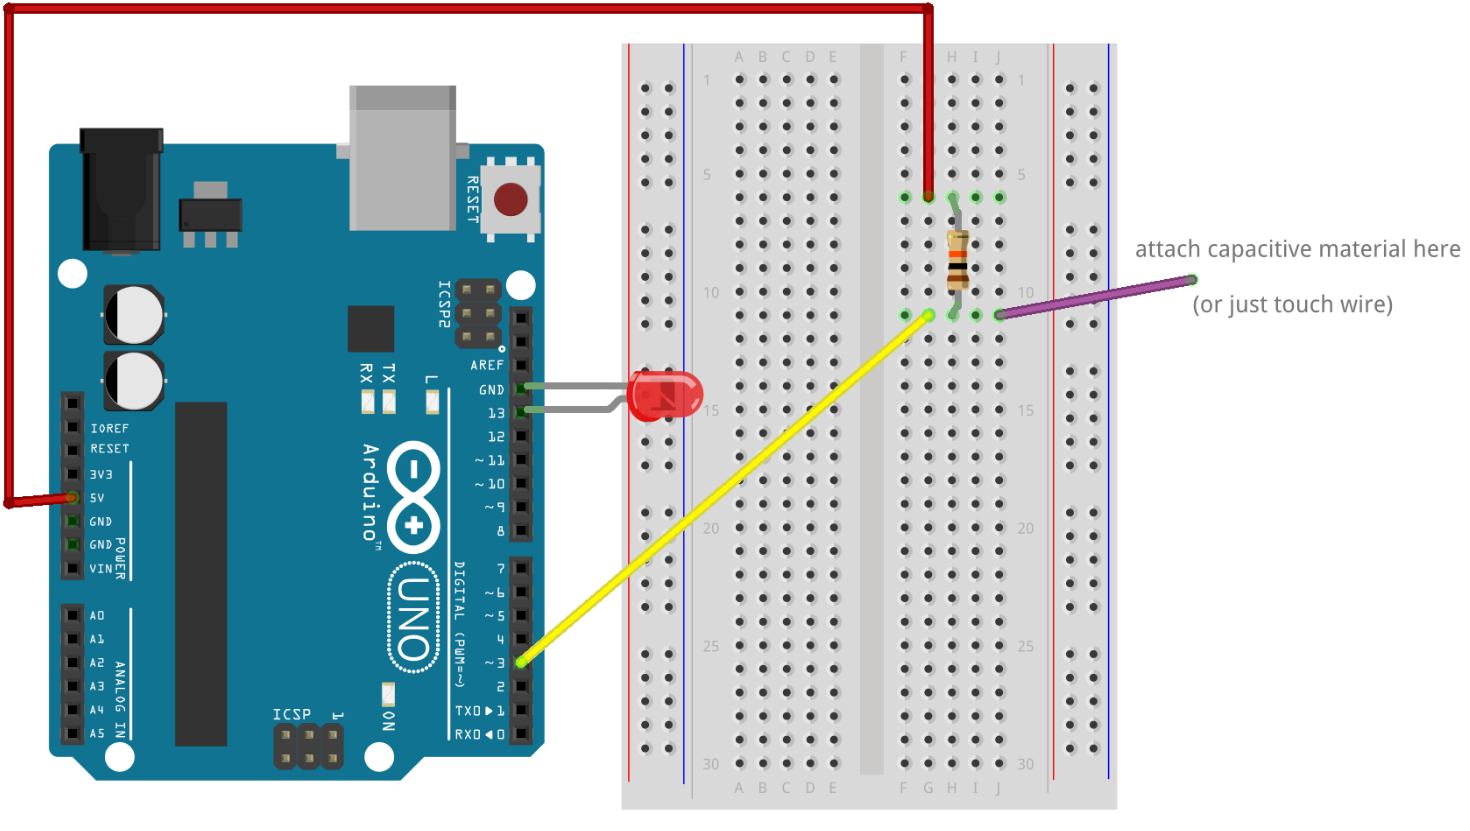
Components
1 x 10k or 1M ohm resistor
1 LED
1 x Arduino Uno
1 x breadboard
jumper wires
Setup
Arduino sketch
Note: you may need to play with the touchedCutoff value. This works with at 10k ohm resistor, but could be made more sensitive with a 1 megaohm resistor.
/**
 * Capacitive touch example, adapted by Eva Snyder from
 * http://www.instructables.com/id/Turn-a-pencil-drawing-into-a-capacitive-sensor-for/
 **/

// Pin for the LED
int LEDPin = 13;

// Pin to connect to your conductive sensor
// (paperclip, conductive paint/fabric/thread, wire)
int capSensePin = 2;

// This is how high the sensor needs to read in order
//  to trigger a touch.  You'll find this number
//  by trial and error, or you could take readings at
//  the start of the program to dynamically calculate this.
// If this is not sensitive enough, try a resistor with more ohms.
int touchedCutoff = .5;

void setup(){
  Serial.begin(9600);
  // Set up the LED
  pinMode(LEDPin, OUTPUT);
  digitalWrite(LEDPin, LOW);
}

void loop(){
  // If the capacitive sensor reads above a certain threshold,
  //  turn on the LED
  if (readCapacitivePin(capSensePin) > touchedCutoff) {
    digitalWrite(LEDPin, HIGH);
  }
  else {
    digitalWrite(LEDPin, LOW);
  }

  // Every 500 ms, print the value of the capacitive sensor
  if ( (millis() % 500) == 0){
    Serial.print("Capacitive Sensor reads: ");
    Serial.println(readCapacitivePin(capSensePin));
  }
}

// readCapacitivePin
//  Input: Arduino pin number
//  Output: A number, from 0 to 17 expressing
//          how much capacitance is on the pin
//  When you touch the pin, or whatever you have
//  attached to it, the number will get higher
//  In order for this to work now,
// The pin should have a resistor pulling
//  it up to +5v.
uint8_t readCapacitivePin(int pinToMeasure){
  // This is how you declare a variable which
  //  will hold the PORT, PIN, and DDR registers
  //  on an AVR
  volatile uint8_t* port;
  volatile uint8_t* ddr;
  volatile uint8_t* pin;
  // Here we translate the input pin number from
  //  Arduino pin number to the AVR PORT, PIN, DDR,
  //  and which bit of those registers we care about.
  byte bitmask;
  if ((pinToMeasure >= 0) && (pinToMeasure <= 7)){
    port = &PORTD;
    ddr = &DDRD;
    bitmask = 1 << pinToMeasure;
    pin = &PIND;
  }
  if ((pinToMeasure > 7) && (pinToMeasure <= 13)){
    port = &PORTB;
    ddr = &DDRB;
    bitmask = 1 << (pinToMeasure - 8);
    pin = &PINB;
  }
  if ((pinToMeasure > 13) && (pinToMeasure <= 19)){
    port = &PORTC;
    ddr = &DDRC;
    bitmask = 1 << (pinToMeasure - 13);
    pin = &PINC;
  }
  // Discharge the pin first by setting it low and output
  *port &= ~(bitmask);
  *ddr  |= bitmask;
  delay(1);
  // Make the pin an input WITHOUT the internal pull-up on
  *ddr &= ~(bitmask);
  // Now see how long the pin to get pulled up
  int cycles = 16000;
  for(int i = 0; i < cycles; i++){
    if (*pin & bitmask){
      cycles = i;
      break;
    }
  }
  // Discharge the pin again by setting it low and output
  //  It's important to leave the pins low if you want to
  //  be able to touch more than 1 sensor at a time - if
  //  the sensor is left pulled high, when you touch
  //  two sensors, your body will transfer the charge between
  //  sensors.
  *port &= ~(bitmask);
  *ddr  |= bitmask;

  return cycles;
}